Recipes

Gluten-Free orange cake

Gluten-Free Orange Cake

I made this delicious Gluten-free Orange cake for my family earlier this week and they absolutely loved it! It is also dairy-free, which is a bonus if you are lactose intolerant. You don’t need many ingredients at all and it takes very little time to make. I hope you enjoy it as much as we did. Ingredients 2 1/2 cups Almond Meal 3 tablespoons Cornflour 3 Eggs 1/4 cup Rice Bran or Vegetable oil 3 tablespoons Brown Sugar 2 or 3 large Oranges squeezed to make 250 mls juice Orange Zest Ingredients for the Orange Syrup 1 Orange squeezed 2 tablespoons Lemon Juice 2 tablespoons Brown Sugar 1 teaspoon Vanilla Essence Directions Preheat Oven to 180’C or 350’F Grease and line a round Cake Tin Separate Egg Yolks and Egg Whites. Set the egg whites to the aside Whisk the Egg Yolks with the Brown Sugar until it becomes foamy. Then add the Rice Bran or Vegetable oil. Continue to whisk adding the Orange Juice and the Zest of 2 Oranges Stir in Almond Meal and Cornflour, then set aside With a beater whip the Eggs until they form stiff peaks, then very gently fold them into the rest of the batter. Be sure to fold the Egg whites through the batter evenly but do not beat or overwork. Pour the batter into the prepared cake tin Bake for 20 to 25 minutes. The cake is done when knife comes out clean Remove from the oven and let cool Orange Syrup Use a small pot for the syrup. Add the Orange, Lemon Juice, and Vanilla with the Brown sugar. Bring to the boil then reduce temperature to low. Leave to simmer for 5 to 10 minutes. The syrup should be slightly sticky and not too runny. Brush the syrup all over the cake. This delicious, light, moist cake can be served with Ice cream or Greek Yoghurt. Enjoy!! For another Gluten-free idea, you can find my Apple and Berry Gluten-free Loaf recipe here

Gluten-Free Orange Cake Read More »

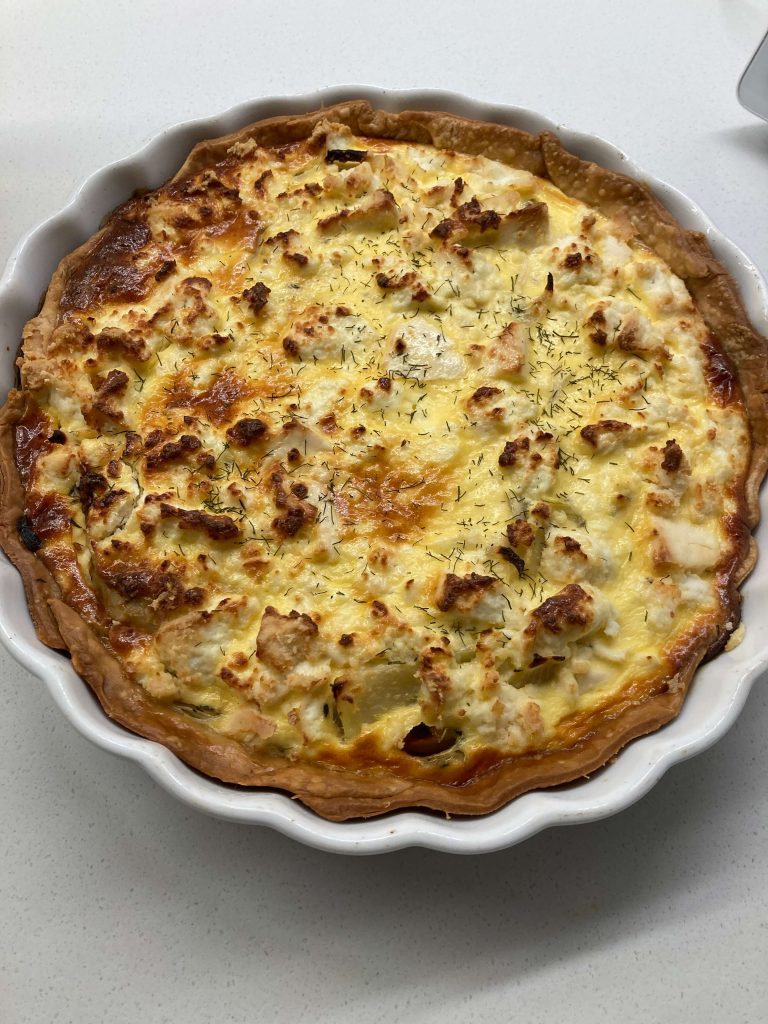
tart for whats up Wednesday

Goat Cheese, Potato and Onion Tart

This Goat Cheese, Potato and Onion tart is very easy to make, it looks impressive, and tastes great. It can also be made ahead of time and frozen as it reheats very nicely. Ingredients Sheet of frozen shortcrust pastry 1 large onion sliced 25 grams butter 1 medium potato sliced 2 cloves crushed garlic 3 eggs 1 teaspoon thyme 140 grams crumbled goat cheese 200 grams creme fraiche or sour cream 1 tablespoon Olive oil salt and pepper Directions Preheat oven to 190C Roll out pastry to fit a deep 23 cm tart tin line pastry with baking paper fill with dry beans and bake for 15 minutes Remove the paper and beans pop back into the oven for a further 5 minutes until the pastry is golden. Set aside Turn the temperature of the oven down to 180C Add onions and sliced potato in a frypan with butter and olive oil on gentle heat. Cook for 10 to 15 minutes. Season with salt and pepper Add garlic and thyme cooking for a further 4 or 5 minutes Pour cooked onion, potatoes, garlic, and thyme into pastry case. crumble goats cheese and spread out evenly Whisk together eggs and Creme Fraiche or sour cream snd season Gently pour into the pastry case Bake for 30-35 minutes until it is a light golden brown and the tart is set in the middle Serve with salad This recipe serves 4-6 and can be easily frozen. Firstly, make sure the tart is completely cool before placing in a freezer bag and sealing it. You can freeze the tart for up to one month. Then when you are ready to serve, just thaw at room temperature for approximately 3-4 hours and reheat for 20 minutes at 180C. My family loved this Goat cheese, potato, and onion tart for dinner on Wednesday night. Next time I entertain I will make this tart for sure. Just looks and tastes great. Guaranteed to impress your friends and family. Enjoy!! If you are looking for another dinner idea click here for my Simple Chicken and vegetable stir fry.      

Goat Cheese, Potato and Onion Tart Read More »

berries on apple and berry loaf

Apple and Berry Gluten-Free Loaf

This delicious Apple and Berry Gluten-free loaf is incredibly moist. We love eating it for dessert served with cream or ice cream and we especially love eating it for Breakfast! That’s right dessert for breakfast minus the guilt because it’s actually full of healthy ingredients and it’s not super sweet. When we have it for breakfast we serve it up with a nice dollop of Greek yoghurt or creamy ricotta and berries. It is so delicious and it just looks so pretty with all the rich colours. The old saying “You eat with your eyes” comes to mind here and I think that this is certainly true. When a dish looks visually appealing it is even more appetizing. A good thing to note is that because the loaf is so moist it is a good idea to pop a slice under the grill and toast it first. Then it comes out with the most divine crispy edges and adds to the overall flavour and texture. Recipe for Apple and Berry Gluten-Free Loaf Ingredients 3 medium apples grated 1/4 cup of softened butter 1/4 cup brown sugar 2 cups almond meal 3 large eggs 2 teaspoons baking powder pinch of salt 1 teaspoon vanilla 1 teaspoon cinnamon 1 cup frozen mixed berries Method Preheat oven to 175 degrees Celsius or 350 degrees Fahrenheit In a large mixing bowl add grated apple, lightly beaten eggs, salt, baking powder, softened butter, cinnamon, sugar, vanilla. Stir until well combined Add almond meal and stir until combined, be careful not to over stir it. Very gently stir the berries through the mixture. There is no need to defrost the berries beforehand and of course, you can use fresh berries too Put the batter into a loaf tin lined with baking paper Cook in the oven for 50 minutes Let the loaf cool in the tin completely before serving I hope you enjoy this loaf as much as we do. It’s very simple to make and while it is cooking in the oven your whole house will smell SO good! Enjoy! In case you are after another breakfast idea you can find a recipe for a delicious and healthy Granola here.    

Apple and Berry Gluten-Free Loaf Read More »

hummus

Hummus!

Our family loves hummus, I don’t think our fridge has ever had zero hummus. We eat it with everything, in wraps, as a dip with crackers or vegetables, we even have it as a condiment for lamb and beef. We simply cannot live without it. I usually buy the Aldi hummus as my boys love this one the best. But with lockdown, I have been avoiding going to the supermarket as much as possible. I’m sticking to click and collect at Woolworths as much as I can. On the way home from work I had to stop off at the local fruit shop as we were low on not only hummus but quite a few things. I’m lucky as our fruit shop sells a delicious variety of cheeses, salami, hams, sausages dips, and all sorts of yummies! I found some hummus but it wasn’t the usual brand I buy so out of curiosity I looked at the label and read the ingredients.  I was so surprised to see that it contained canola oil! Now to be fair I’m not sure what the Aldi one contains as I have never looked at the label. Anyhow as I’m sure you know, Canola Oil is not really great for your health. It is not a good source of nutrients and it also contains trans fat. I try hard to avoid canola oil and I stick to either Olive Oil or Rice Bran oil for frying. I was also a bit disappointed in myself that I had neglected to read the ingredients in the store-bought hummus. As I was standing in the fruit shop surprised at what I had found on the label, I remembered a friend of mine made her own hummus, I gave her a quick call and she said all I needed was tahini, garlic, lemon, and tinned chickpeas. Excellent! I bought all the ingredients and headed home, meanwhile, she messaged me the recipe, and here it is Ingredients~ 1 can of chickpeas 1/4 cup of lemon juice 1/4 cup of well-stirred Tahini 1 small clove of garlic 2 tablespoons of olive oil 1/2 teaspoon cumin salt to taste 3 to 4 tablespoons water Directions~ Place chickpeas, lemon juice, tahini, cumin, garlic, and olive oil in a food processor and process until smooth Add salt to taste Add water I added the chickpeas, tahini, garlic,  lemon juice, and olive oil and processed them. I didn’t add the cumin yet because I thought it might dominate. Turns out I was wrong and after I tasted it and consulted my sixteen-year-old son Sam, we both agreed it definitely needed something.  So I added  1/4 teaspoon of cumin instead of the 1/2 teaspoon the recipe said. That was just personal preference. I do use cumin in my cooking but I am a bit cautious with it as I find the smell really pungent. I also added the water gradually until I was happy with the consistency. So all up I think I added about 5 tablespoons of water. The great thing about this recipe is that you can adjust it to suit your taste! The hummus was so creamy, delicious, and unbelievably easy to make. Sam declared it PERFECT! That is a huge call as he knows his hummus well. I guess you could say he’s a hummus connoisseur. I have never used tahini before and I didn’t even know what it was. Well, it turns out tahini is just sesame seeds all ground up. The recipe says to add well-stirred tahini paste. The reason is that the oil sits on the top of the jar and this needs to be mixed through before you use it. I think from now on I will be making my own hummus, it was just that good. Plus I will be using olive oil instead of the dreaded canola oil. I know it’s so much easier to throw the packaged hummus into your supermarket trolley as I have been doing for years. But honestly, after tasting the homemade version I don’t think I can go back. It really and truly was so very easy to make. One Final Note~ I guess I just really want to emphasize that the beauty of this recipe is that you can adjust it to your taste. We are super fussy about our hummus so I didn’t just stick to the quantities of seasoning the recipe says. I tasted, added, then tasted some more until I was confident it was just right! That’s it for today. Home-made hummus and now there is no turning back!!!  

Hummus! Read More »

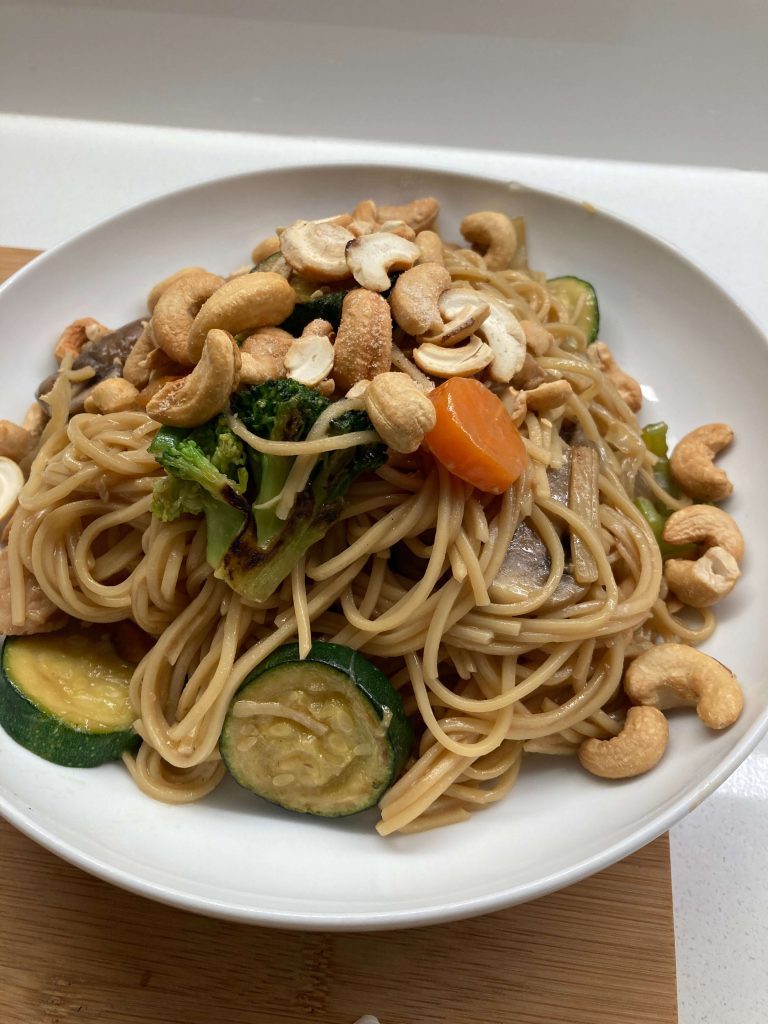
stir fry for blog recipe

My Simple Chicken and Vegetable Stir Fry

Hi Friends! I thought today I would share my Simple Chicken Stir Fry recipe with you. I just love eating this chicken stir fry as it is full of delicious vegetables! It’s also a great way to use up vegetables that we have in our fridge that might otherwise go uneaten as they don’t last as long as others. Hello, mushrooms! Whenever I’ve run out of fresh vegetables, I have also used frozen vegetables. I like to keep a bag of mixed stir fry vegetables in the freezer just in case. You could substitute the chicken with beef, pork, or tofu too. And of course, you could just have vegetables only. My family loves this dinner and it is constantly on repeat in our home. A while ago, and I don’t know where, I read that if you marinate your chicken breast in garlic, soy sauce, and cornflour. It will make the chicken nice and tender. So that is exactly what I do, and yes ma’am we get juicy tender chicken. Soooo good! Another benefit of using the cornflour is that it thickens the sauce up too. Win-win!     Ingredients 750 grams chicken breast Rice Bran Oil or Olive Oil 1 or 2 cloves of garlic 2 stalks of celery sliced 1 medium onion sliced 3 cups of Fresh or Frozen vegetables (we like mushrooms, zucchini, capsicum, carrot, broccoli, beans) 1/2 teaspoon ginger powder 1/4 cup soy sauce 1 1/2 or 2 cups of chicken stock (we like a saucy stir fry so I use 2 cups) 2 tablespoons cornflour Instructions Slice chicken breast and marinate it in garlic, soy sauce, cornflour, and ginger for about 30 minutes. Drizzle pan with oil and stir fry the onion and celery for about 1 minute then add the rest of your preferred vegetables. Saute for about 5 minutes until cooked but not overcooked. They’re nicer with a bit of crunch. Set aside Brown chicken then add the rest of the marinade and chicken stock. Bring to boil then turn down the heat and simmer for 5 minutes. Combine the chicken with the vegetables and serve over rice or noodles. We add cashew over the top of our stir fry. My family is obsessed with cashews. You could also garnish with lots of yummy chopped coriander. I didn’t have any the day I made it, but if your family likes coriander like mine does then go ahead and add it. It gives it that extra zing. Another thing I would like to say is that I will season as I go along and if I think it needs more soy sauce I’ll add some more. Same with salt and pepper or any other seasoning. If I think it needs it, then in it goes. I hope you try this recipe, it really is easy to make and full of delicious goodness!

My Simple Chicken and Vegetable Stir Fry Read More »

jam drop

Jam Drop Recipe

Jam Drops Recipe I thought today I would share a Jam drop recipe with you.  They not only taste delicious they also look great with that spot of jam smack in the middle. I can’t think of a better-looking biscuit, can you? One of the reasons why I love this recipe so much is because it has wholemeal spelt flour instead of just white flour. Plus it also contains almond meal which I think gives it a really nice nutty flavour. Additionally, Spelt flour is so much better for you than regular old flour. So it’s a win/win. Health in a sweet biscuit (sort of). If these Jam drops last long enough at my house, my son might be lucky enough to get them in his lunch box. Yes, he’s a big boy but he loves a good Jam drop in his lunch box. As for me, I eat one (or three) with a cup of tea in the evening after dinner when all the chores are done. So it’s like a reward after a long day!   Jam Drop Recipe INGREDIENTS 1 cup rolled oats 125 grams softened butter 1 Teaspoon Vanilla extract 1/2 cup brown sugar 1 egg 1 cup spelt wholemeal flour 1 cup almond meal 1 teaspoon baking powder fruit jam METHOD Line a cookie sheet with baking paper. Use a food processor to grind the oats into a fine flour Cream butter, sugar and vanilla using an electric beater on high until it is fluffy and light  Add egg and mix until just combined Add oat flour, spelt flour,  almond meal, and baking powder. Stir until combined. Place in fridge for approximately 30 minutes. Roll portions about the size of a walnut into balls and place them on the prepared tray. Make sure they are roughly 3 cm apart Use your thumb to press the centre of the balls to make a well. Spoon about 1/4 teaspoon of jam into each hole. Bake for 10-15 minutes at 175 degrees C Allow them to cool on the tray and then transfer to a wire rack, where they should cool completely. And that’s it! delicious Jam drops. Oh yes, another thing I think they’re called Thumbprint cookies in America. Just in case you’re interested in another recipe here’s a link to my Best Granola Ever which is full of crunchy goodness! Hope you all have a great rest of the week and thanks for stopping by today and having a look at my Jam drop recipe Please feel free to leave me a comment. I always appreciate them!  

Jam Drop Recipe Read More »

Granola Recipe

Healthy Granola Recipe

Today I want to share with you this absolutely delicious Healthy Granola Recipe. It has just the right amount of sweetness, crunch, and goodness. My family absolutely loves this Granola. They have it for breakfast with milk or they have it just on its own as a snack. It can be heaped on some yoghurt with a dash of honey and it can be added to steamy, creamy porridge! mmmmmmm YUM! This Granola is packed with wholesome goodness. Full of fibre, proteins, and minerals and full of nutrients we all want our families to feast on. But here’s the thing. I try super hard to avoid store-bought cereal that is full of sugar and a bunch of other stuff that is less than ideal. However realistically, I also work full time, and some weeks I just don’t quite reach my ideal goal of superwoman and I have to go with store-bought cereal. And that’s OK. But mostly I try and make this Granola because it is so worth it! This quantity will last about two weeks for the three of us. Healthy Granola Recipe Ingredients 2 Cups Rolled Oats 3 Cups Coconut Flakes 1 1/2 Cups Mixed Nuts- Chopped or Crushed 1/4 cup Pepitas 1/4 cup Sunflower Seeds 1/2 Cup Dates 1/4 cup dried cranberries 2 Tsp Cinnamon 1 Tsp Vanilla 3/4 Cup of melted Coconut Oil 1/4 Cup Maple Syrup Directions Preheat Oven to 160 C Line a big baking tray with Baking paper Mix all dry ingredients except the dates and cranberries in a bowl Add coconut oil and Maple Syrup, stirring well Spread the mixture onto the lined baking tray. Make sure to spread it out to form one layer. Place in oven for approximately 10 minutes, stir then put back in the oven for 10 minutes. Granola is ready when it is a lovely golden colour. Once the granola comes out of the oven stir in the dates and cranberries. Cool completely and then store the healthy granola in jars.    These are the jars I use. Aren’t they cute? I picked them up from Kmart and I love them! I divide my Granola into two of these jars and they fit perfectly! The recipe includes Coconut Flakes and the only place where I have been able to find coconut flakes has been in Aldi. I admit I haven’t tried health food stores but I did look in Coles and Woolworths and all I could find was Desiccated coconut. While I’m sure desiccated coconut would be ok. I think that these flakes absolutely give the Granola that extra bit of crunchy texture. So there you have it. Seriously THE best Healthy Granola Recipe. Try it. You won’t be disappointed. ********* Here Is Another Healthy Recipe You Might Like To Try Healthy Banana Bread Recipe

Healthy Granola Recipe Read More »